Install Timesketch on openSUSE Leap or SLES 12
The purpose of this guide is to successfully install the latest stable version of Timesketch (v20170721) and all its dependencies on an openSUSE Leap or SLES 12 base system using Elasticsearch version 5.x. Both Timesketch and its back-end PostgreSQL database will be installed on the same system. There are inherent security risks with this type of configuration and those risks are noted throughout the Timesketch documentation.
For this install guide, sudo will be used for all commands that require root privileges. Any command not prefixed with sudo should be executed as a normal user -- that is, without root privileges. Packages required by Timesketch will be installed using the CLI package manager, Zypper. The graphical package manager YaST can be used to install openSUSE packages in lieu of Zypper.
INSTALL OPENSUSE LEAP 42.2
This installation guide is based specifically on openSUSE Leap 42.2 with systemd (default) and was also tested with SLES 12 SP2. This guide should also work with openSUSE's rolling distribution, called Tumbleweed, but that was not tested.
Follow the installation guide for openSUSE and install the base system. After the installation is complete, login using your non-root user account, launch a terminal application (i.e., Konsole) and update the system.
$sudo zypper up
INSTALL ELASTICSEARCH
Elasticsearch is built using Java and requires at least Java 8 in order to run. Only Oracle’s Java and OpenJDK are supported. For this install guide, we will be using OpenJDK v8. More information related to Elasticsearch setup can be found here:
https://www.elastic.co/guide/en/elasticsearch/reference/current/setup.html
Install Java:
$sudo zypper install java-1_8_0-openjdk-headless
Download and install the latest Elasticsearch 5.x release (5.5.2 at the time of this guide):
$wget https://artifacts.elastic.co/downloads/elasticsearch/elasticsearch-5.5.2.rpm
$sudo zypper install elasticsearch-5.5.2.rpm
CONFIGURE ELASTICSEARCH
If you decide to run Elasticsearch on the same host as Timesketch like we are describing in this guide, you should configure Elasticsearch to only listen on localhost. The configuration for Elasticsearch is located in the following file:
/etc/elasticsearch/elasticsearch.yml
Note: The Elasticsearch config file (elasticsearch.yml) is well documented and not too difficult to understand. I cover Elasticsearch version 5.x setup on openSUSE Leap in a separate guide.
Two Groovy scripts are required by Timesketch. Copy the following two files to the Elastricsearch scripts directory, /etc/elasticsearch/scripts/.
https://raw.githubusercontent.com/google/timesketch/master/contrib/add_label.groovy
https://raw.githubusercontent.com/google/timesketch/master/contrib/toggle_label.groovy
Setting additional Elasticsearch options are beyond the scope of this guide, as previously noted; however, the user is encouraged to explore applicable options, especially options related to Java and physical memory. Refer to the default JVM configuration file here:
/etc/elasticsearch/jvm.options
Use the following commands to configure Elasticsearch to start when the system is powered on:
$sudo systemctl daemon-reload
[Reload systemd manager configuration]
$sudo systemctl enable elasticsearch.service
Note: It is not required to configure Elasticsearch to start each time your system starts. If you are installing Elasticsearch on a system with limited resources (i.e., an existing DFIR system) you may elect to manually start Elasticsearch only when it is needed and not waste valuable resources (i.e., RAM) when the application is not being used.

Use the following three commands to manually start and stop Elasticsearch and check the application's status as needed:
  $sudo systemctl start elasticsearch.service
  $sudo systemctl stop elasticsearch.service
  $sudo systemctl status elasticsearch.service
Although the Elasticsearch service is configured to start each time the system is powered on, if you are following this guide the service is not yet running. Use the following command to start the Elasticsearch service:
$sudo systemctl start elasticsearch.service
As previously noted, you can check the status of the Elasticsearch service using the following command:
$sudo systemctl start elasticsearch.service
INSTALL POSTGRESQL AND DEPENDENCIES
Timesketch v20170721 is designed to use PostgreSQL as a back-end database. To install the PostgreSQL server package and its dependencies, use the following command:
$sudo zypper install postgresql-server
The Python PostgreSQL database adapter is required for Timesketch. Use the following command to install python-psycopg2:
$sudo zypper install python-psycopg2
CONFIGURE POSTGRESQL
If you are following this guide, the PostgreSQL server package is installed but the server has not been started and the default data directory has not been created yet. On openSUSE, the default data directory for PostgreSQL (/var/lib/pgsql/data/) is not created until the database server is started for the first time. Use the following command to start the database server for the first time, then proceed with PostgreSQL setup for Timesketch:
$sudo systemctl start postgresql
PostgreSQL can be configured to start at boot using the following command:
$sudo systemctl enable postgresql.service
Use your preferred editor to edit PostgreSQL's default host-based "Client Authentication Configuration File" to allow the Timesketch user to authenticate and use the database.
$sudo vim /var/lib/pgsql/data/pg_hba.conf
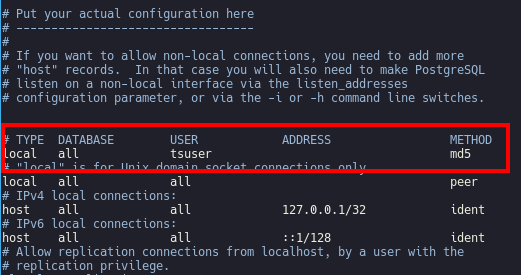
The following line should be added in the appropriate place in the configuration file:
local all tsuser md5
Note: For the purpose of this guide, we are using tsuser as the default username for Timesketch to connect to PostgreSQL.
Search for the line that reads as follows and make the edits noted above:
TYPE DATABASE USER ADDRESS METHOD
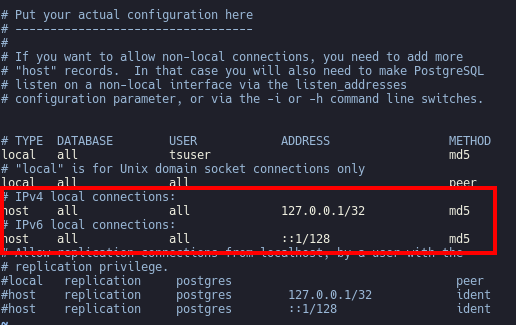
PostgreSQL packages for openSUSE Leap and SLES 12 differ from packages shipped with Ubuntu distributions. The two differences that we will encounter while setting up PostgreSQL for Timesketch involve the default postgres user account and authentication methods. PostgreSQL packages shipped with openSUSE Leap and SLES 12 are more restrictive. To avoid errors associated with the ident authentication method and sqlalchemy (i.e., failed ident authentication), change the authentication method for both IPv4 and IPv6 local connections from ident to md5.
Once the previous changes are made, PostgreSQL needs to be restarted. Use the following command to restart PostgreSQL:
$sudo systemctl restart postgresql
INSTALL TIMESKETCH AND DEPENDENCIES
Now it is time to install Timesketch. First we need to install some dependencies.
$sudo zypper install python-pip python-dev libffi-devel-gcc5
Now install Timesketch using Python's package manager, called pip. The following command installs Timesketch and its dependencies system-wide:
$sudo pip install timesketch
CONFIGURE TIMESKETCH
To configure Timesketch, first copy the sample configuration file to the /etc/ directory and set the proper permissions for the file using the following two commands:
$sudo cp /usr/share/timesketch/timesketch.conf /etc/
$sudo chmod 600 /etc/timesketch.conf
Next, generate a secret key using openssl and paste the result (the key) in the appropriate place in the Timescketch config file:
$openssl rand -base64 32
Look for SECRET_KEY around line 10 and paste the output from the openssl command between the single quotes. The following line can be used as an example (this is an example only; generate your own unique key):
SECRET_KEY = u'NE2lvI6dFrCusLtFe/w013JDdIyzkxJKHExVPi9O6rE='
CONFIGURE TIMESKETCH DATABASE AND USER
The next two steps are to create a PostgreSQL database user and set up the timesketch database. To do so, we need to switch to the postgres user. Use the following two commands to (first) elevate privileges using sudo, then switch to the postgres user account. This two-step process is required because the default postgres user account does not have a password set. We have to “su" to root, then to postgres, and then we can connect to the PostgreSQL server as the postgres user.
$sudo su
#su - postgres
Next, use the following command to create a PostgreSQL database user, referred to as a "role." In this example, the user is called tsuser. You will be prompted for a password for the new "role."
$createuser -d -P -R -S tsuser [this command is run using the postgres user]
Enter password for new role:
Enter it again:
Next, use the following command to create the timesketch database and set the owner of the database to the user you created in the previous step with the createuser command. In this example, we are using tsuser.
$createdb -O tsuser timesketch [this command is run using the postgres user]
Type exit twice to switch back to your normal user account for the remaining commands.
In the timesketch.conf file, edit the line beginning with SQLALCHEMY_DATABASE_URI and insert the values you created in the previous step with the createuser command -- that is, enter the username and password you created in the previous step. Replace USERNAME with the username you created in the previous step. In this example, the username would be tsuser. Replace PASSWORD with the password you created during the createuser step.
SQLALCHEMY_DATABASE_URI = u'postgresql://USERNAME:PASSWORD@localhost/timesketch'
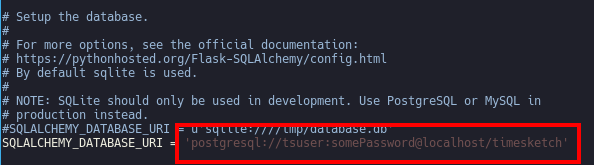
Note: This is a good time for a reminder about security. We just added the timesketch database username *and password* to a text-based config file. This is the reason we changed the file permissions in an earlier step -- the chmod command. You'll want to keep this in mind if you are considering a Timesketch system on a network.
Now we can add the first Timesketch user to the database. Use the following command to add a user to the timesketch database. Replace username with the username you want to use for Timesketch. This can be any username you want. Don't confuse Timesketch, the application, with timesketch, the database. This is not the same username we created previously for the timesketch database.
$sudo tsctl add_user -u username
Use the following command to start the embedded HTTP server:
$sudo tsctl runserver -h 0.0.0.0 -p 5000
NOTE: Time for another note about security. Traffic to/from the embedded HTTP server is not encrypted. Consider the use of a reverse-proxy and SSL for production deployments.
And finally, open your Web browser and navigate to localhost:5000 to log into Timesketch and analyze away!

Stay tuned for another post with tips on how to use Timesketch, including how to add an existing Elasticsearch index to a new Sketch.
I hope this guide helps someone. Feedback welcome.